Guide: How to Make Bracelets with Beads for Beginners
There can be many great reasons to make your own jewelry. Whether you are looking for something fun and engaging to do, or an activity to complete with friends or kids, hand making your own jewelry can easily fill that role. You may also find that the attention to detail and focus that it requires is meditative in its nature, and great for relieving any stress that you have. Plus, you can make your pieces of jewelry to match and compliment the outfits in your wardrobe.
This means that not only can you make the piece of jewelry to match any outfit you have, but as you update and change your wardrobe throughout the years, you will be able to change the piece that you have as well. This also presents the opportunity to upcycle any piece of older jewelry that you may have. From a vintage piece found in a shop or received from a family member, to a broken piece of jewelry that has a special meaning, knowing how to craft your own pieces of jewelry means that you can save these pieces in new and creative ways.
Hand made pieces such as this also make fantastic gifts, as they come from the heart, and the recipient will be able to see and appreciate this. And as you make more and more pieces you may find that you really enjoy it, at which point you can consider using your handmade pieces as a way to supplement your income.
Materials and Tools Needed to Make a Beaded Bracelet
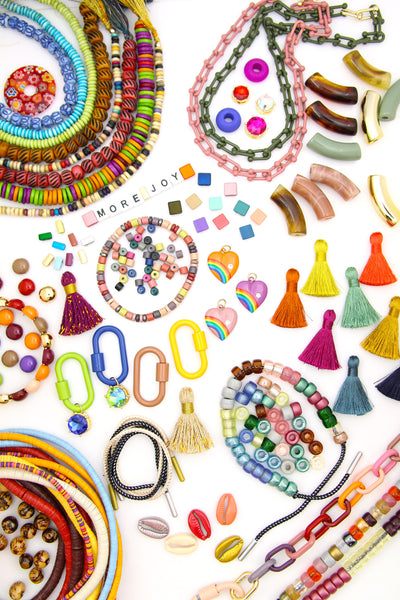
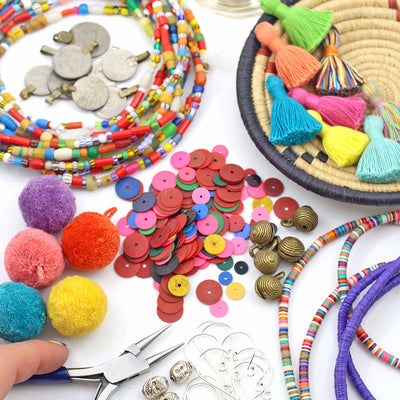
You will need a few tools and supplies to construct your own jewelry, starting with elastic of 1mm thickness, a powerful bonding agent such as G-S Hypo-Cement, a bead stopper or tape to hold beads in place, small scissors or jewelry snips, a ruler or measuring tape, and any beads with a hole of at least 1mm thickness, such as our acai, bone, or wooden options.
There are so many possibilities when it comes to bead selection, that you might be a little overwhelmed about all the options available to you. You can choose natural options that can be made of recycled glass, deer or elk antlers, bamboo, or even lava rock. There are also vintage varieties which offer retro appeal, and gemstone beads which are glamorous and have the appearance of luxury. Artistic glass options offer a wide variety of combinations and colors for you to choose from, and cubic zirconia varieties can lend style and sparkle to your project. You can also elevate your piece through not only the options that you select but also through the implementation of poms and tassels, which bring a different weight and texture to your piece.

Step-by-Step Process
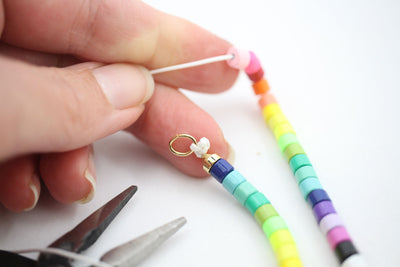
Your first step, after assembling all of your supplies in front of you, will be to prepare your length of elastic cord. You generally want this to be around four to six inches longer than the final piece will be. Once you have this, attach a bead stopper, about three inches from the end of the cord.
Next, you will need to string the beads onto the cord. If you need to, you can use a beading needle to thread them onto the cord, otherwise, you string them directly by hand. Take special care to work these on one at a time, and pause to periodically check the thickness of the piece when it is draped on your wrist.
Now that you have your bracelet looking how you hoped, you need to knot the cord. This is the step that can take the most practice to get perfect because the ends can be slippery and the last you need is all those beads slipping off and sending you back to step one. In most cases, a square knot will do just fine and will allow you to easily hide the knot when you are finished. First, you need to remove the bead stopper and needle, then bring both ends together. Carefully start the first half of the knot, gently pulling the cord to remove any slack. Then, holding the first half in place, tie the second half of your knot, and pull firmly to secure.
To hide your knot, pull the beading away, and apply a tiny drop of glue directly onto the knot. While the glue is still sticky, hold them an inch down the line, and tug to pull the knot inside of the adjacent beads.
The last thing to do is to trim the loose ends of the cord. You want to be sure to do this after the glue has completely dried, so check the instructions on the package to determine when the glue has set. Very gently, stretch out each cord end, and use your scissors to trim the end close to the beading.
Buy the Beads You Need
If you really enjoy the process of making your own beaded bracelets, you'll probably want to continue on and make more of them, either for yourself or to present to friends and relatives. That means you'll need to have a source where you can get your supplies, especially the all-important beading you need for your projects. Contact us at WomanShopsWorld or visit our online store to find everything you need, especially the tremendous selection of different types of beads, tassels, and charms which you can use to make your exciting creations.


Leave a comment