How to DIY Candy Heishi Disc Beaded Bracelets
Jewelry should make you smile; otherwise, what's the point?! Spring into fun with the most fashionable jewelry on the block. Warmer weather means longer days, shorter sleeves and new opportunities to rock a kaleidoscope of arm candy.
Designer jewelry has its place, but it's more gratifying to make your own trendy style. Jewelry is SO much more fun to wear knowing that you created it, and the compliments are a lot more meaningful too!
Let us show you how to DIY the coolest accessory of the season: enamel bead bracelet stacks. These beaded bracelets are reminiscent of the bracelets and necklaces you strung for your friends at camp: whimsical, colorful, easy to match, and easy to stack. There's a reason you loved this style, and a reason it's making a comeback: it's fun!
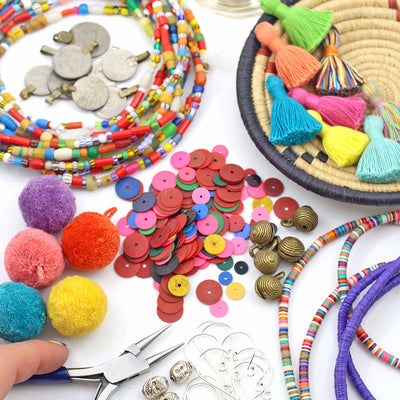
All you need to make these bracelets is one of our DIY kits; we provide you with the elastic, a tube of jewelry glue, and all of the beads (in your color choices!), with the option of a tassel.
Once you've got your kit in hand, just clear a space, grab a ruler or tape measure, find an hour or so, and jump in.
Here's the How-To in video form (and ignore me talking to other people...we repurposed this video from an Instagram Live session.)
And here are the Steps and still photos:
1. Decide on a color pattern for your beads. You've probably already thought about this when you ordered your kit. But it's helpful to lay out a color pattern at this point, so you don't have to undo something later.
2. Once you've got your pattern planned out, cut a piece of elastic about 12" long. This should give you plenty of room to work.
Pro Tip: I like to put a piece of scotch tape or washi tape on the end of my elastic so that the beads don't spill off the end. You can also use a bead stopper if you have one, but if you don't tape does the trick just fine!
3. Start stringing your beads on to the elastic, following your pattern. I like to measure every so often to see where I am in the length of the bracelet, so that if I'm adding letters, I know when to add them.
I've found that 7.125" is the perfect length for my wrist, but you might find differently. You can measure before you tie the knot to make sure it will fit just right.
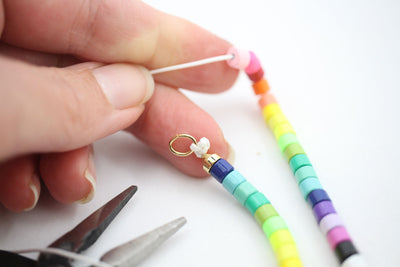
4. Once you have strung on all of your beads, add the tassel if you have one. The easiest way to do this is to slide the needle threader through the loop on the top of the tassel, then put the elastic through the loop in the threader. 

Pull the threader back through the tassel loop, and voila! The elastic is now threaded through the tassel.

5. Check to make sure that your bracelet will fit you. You want it to be comfortably snug, as it's elastic. Once you've confirmed the length, it's time to tie the knot. Make sure you have your glue handy.
I like to tie a standard square knot. To do this, take the right side of elastic and loop it over the left side, and pull it underneath. Repeat the same step with the left side. So the knot should go right over left, then left over right. 
When you are ready to tighten the knot, stretch the beads tight, so that the knot will sit snuggly. 
Grab your tube of G.S. Hypo Cement and put a dot of glue on the knot. I love this glue because it's sturdy, but it also has a needle applicator, so it's easy to get it in tiny spots just where you need it. I like to let my glue dry a bit before I trim off the elastic ends. 

Once the glue dries, trim the excess elastic. 
You're ready to put on your new bracelet!

You can purchase our DIY bracelet kit below.


Leave a comment