How to DIY Enamel Tile/Tila Bead Bracelets
How to DIY Enamel Tile/Tila Bead Bracelets
Do you love the tile bead colorblock bracelets on wrists everywhere this season?
Have you thought about making your own? Designer brands are fun and all, but you've got enough style to set your own trends!
Create an arm full of fun and be fashionably trendy while DIY-ing your own stacking bracelets!
We'll show you how!
We know a good trend when we see it, and are so excited to be the only shop offering these fun beads! We're all about offering a trendy selection of crafty supplies, so you have the joy and satisfaction of creating fashion-forward bijoux.
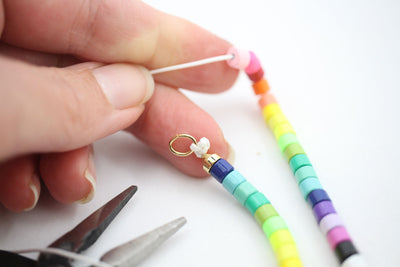
Keep in mind these beads have either 2 or 3 holes, so they take a little patience to string. Once you get the hang of it, they are easy to work with. Plus, the bracelets are SO fun to wear knowing that you created them!
Here's a little video showing you how to string these enamel tile beads.
Step by Step DIY Instructions
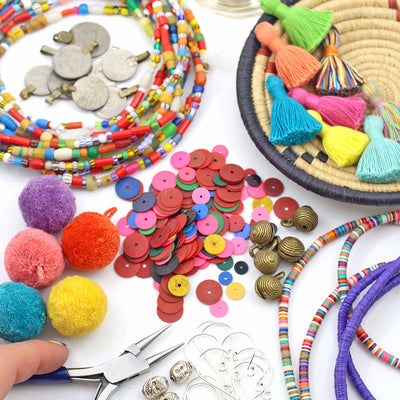
You'll Need:
- Enough Enamel Tile Beads to complete a bracelet, depending on shape:
- Squares/Rectangles: approx. 10 squares & 25 rectangles
- Honeycombs: approx. 20 beads
- Arrows: approx. 45 small arrows (large arrows coming soon!!)
- Two sections of Beading Elastic about 12" long ( we recommend the Korean elastic thread that comes with your WSW bead order).
- Two 8" Elastic Cord Needles
- Scissors
Step 1: Decide on a color pattern to create, and line the beads up in that order. It is helpful to line them up against the edge of a ruler for bracelet sizing. We recommend 7 - 7.25" of beads per bracelet.
Step 2: Thread your needles using a needle threader. We reccomend doubling the elastic, for maximum durability in your bracelet. So this means you should cut each piece of elastic to double the length of your bracelet, plus a few extra inches to work with. Put a small piece of scotch tape on the ends of the elastic to keep the beads from spilling off while you're working.
Step 3: String the beads on in your desired pattern.
Note: Now, things get a little tricky. You'll be stringing through holes that already have elastic going through them to close off the loop and complete the bracelet. You'll need to hide the knots on the underside of the beads.
Step 4: Place the strung beads so that their backside is facing up, in a "U" shape on your work surface. Hold the end of both sides' elastic in your left hand, and flip the end bead on the right side over, so it is face-up. Essentially, you want to envision what the bracelet will look like when it is a completed loop. 

Step 6: Thread needle with outermost elastic from right side of right bead through outermost hole on left side of bead on left side. Repeat with remaining piece of elastic from bead on right, and second hole on bead on left side. You can go through a few beads for added strength if you'd like. Your elastic should look like this:
Step 7: Tie a knot in those 2 pieces of elastic, on the interior of bead. Trim excess thread.
Step 8: Now you should have 2 loose pieces of elastic remaining.

Step 9: Thread the 2 remaining pieces through the aligning holes, so that the ends of the elastic are on the underside of a bead. Tighten any slack in the elastic (you want it to be fairly taught, so that it will sit snug on your wrist). Tie a knot on each elastic piece inside the bead. Trim excess elastic.

Step 10: Put on your new bracelet!
Be sure to visit our Enamel Tile Tila Beads section to see all of the shapes that we offer.
We also offer a DIY kit, where you can choose your colors and letters.


looks pretty cool 😎
looks pretty cool 😎
Leave a comment